Introduction
Code on Github: Install Elasticsearch with Public Certs
We will install Elasticsearch and Kibana and secure it with publicly signed SSL certificates. We assume you already made publicly signed SSL certificates (eg. Let's Encrypt) in advance. If you do not have publicly signed SSL certificates yet, then follow these instructions to generate free Let's Encrypt SSL certificates.
Requirements
In the video, we used two instances of Ubuntu 20.04 running on a VM in a cloud service.
We assume you also have A Records in your DNS that map one domain to the Elasticsearch VM and one domain to the Kibana VM. For our demonstration below, we will use elastic.evermight.net and kibana.evermight.net.
Steps
Step 1 - Update Ubuntu [01:10]
Both Ubuntu installations are brand new. We update the distribution as well as install some tools we typically use on both machines.
apt-get update && apt dist-upgrade -y && apt-get install -y vim curl gnupg gpg
Step 2 - Install Elasticsearch [01:53]
Run these commands on elastic.evermight.net to install Elasticsearch:
wget -qO - https://artifacts.elastic.co/GPG-KEY-elasticsearch | sudo gpg --dearmor -o /usr/share/keyrings/elasticsearch-keyring.gpg;
echo 'deb [signed-by=/usr/share/keyrings/elasticsearch-keyring.gpg] https://artifacts.elastic.co/packages/8.x/apt stable main' | sudo tee /etc/apt/sources.list.d/elastic-8.x.list;
apt-get install -y apt-transport-https;
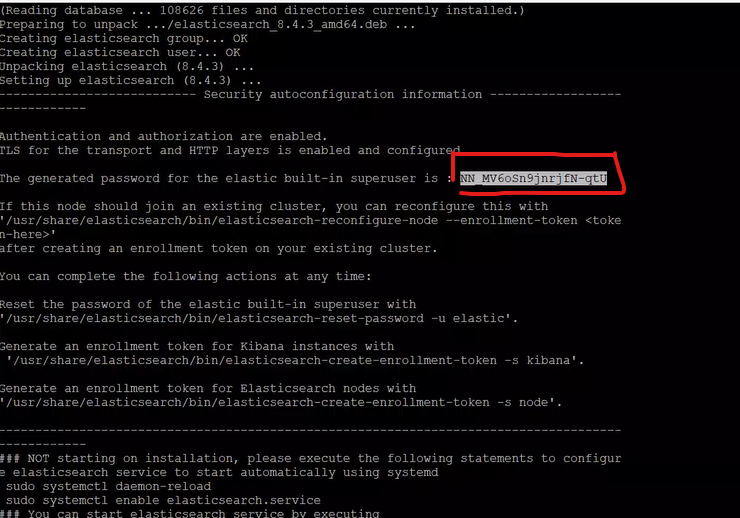
apt-get install -y elasticsearch;
When installation is complete, make sure you write down the password.

Step 3 - Configure Elasticsearch [05:00]
Run this command on our elastic.evermight.net machine:
Copy over SSL certificates:
mkdir /etc/elasticsearch/certs/elastic.evermight.net
Then copy your SSL certificates into the directory above.
Edit elasticsearch.yml
Go to the /etc/elasticsearch/elasticsearch.yml file. Edit the following fields:
cluster.name: <anything you want>
network.host: elastic.evermight.net
http.port: 9200
xpack.security.http.ssl:
  enabled: true
  key: certs/elastic.everimght.net/privkey1.pem
  certificate: certs/elastic.everimght.net/fullchain1.pem
Here is our completed version of elasticsearch.yml
Change ownership
chown -R elasticsearch:elasticsearch /etc/elasticsearch
Step 4 - Start Elasticsearch [10:40]
Start elasticsearch with these commands:
systemctl enable elasticsearch;
systemctl start elasticsearch;
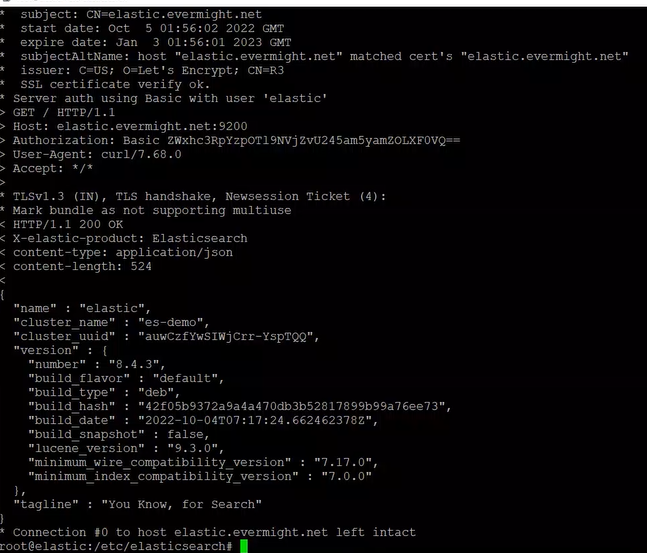
Confirm elasticsearch is working with this command:
curl -v -u elastic:<password from Step 2> https://elastic.everimght.net:9200
And you should see something like this:

Step 5 - Install Kibana [15:26]
Run this command on the kibana.evermight.net machine to install Kibana:
wget -qO - https://artifacts.elastic.co/GPG-KEY-elasticsearch | sudo gpg --dearmor -o /usr/share/keyrings/elasticsearch-keyring.gpg;
echo 'deb [signed-by=/usr/share/keyrings/elasticsearch-keyring.gpg] https://artifacts.elastic.co/packages/8.x/apt stable main' | sudo tee /etc/apt/sources.list.d/elastic-8.x.list;
apt-get install -y apt-transport-https;
apt-get install -y kibana;
Step 6 - Configure Kibana [15:26]
Copy over SSL certificates:
Run this command on your kibana.evermight.net server:
mkdir /etc/kibana/certs/kibana.evermight.net/
Then copy your SSL certificates into the directory above.
Edit kibana.yml
Go to the /etc/kibana/kibana.yml file. Edit the following fields:
server.port: 5601
server.host: 0.0.0.0
server.publicBaseUrl: "https://kibana.evermight.net:5601"
server.ssl.enabled: true
server.ssl.key: /etc/kibana/certs/kibana.evermight.net/privkey1.pem
server.ssl.certificate: /etc/kibana/certs/kibana.evermight.net/fullchain1.pem
elasticsearch.hosts: ["https://elastic.evermight.net:9200"]
elasticsearch.ssl.verificationMode: full
Here is our completed version of kibana.yml
Create Service Token
Run this command on the Elasticsearch server:
/usr/share/elasticsearch/bin/elasticsearch-service-tokens create elastic/kibana kibana-token
chown -R elasticsearch:elasticsearch /etc/elasticsearch
Copy the token that you see.
Run this command on the Kibana server:
/usr/share/kibana/bin/kibana add elasticsearch.serviceAccountToken
Paste in the token after the prompt.
Step 7 - Start Kibana [27:32]
systemctl enable kibana;
systemctl start kibana;
Now you can visit https://kibana.evermight.net:5601/ and login with elastic and the password from step 3.
